Friday, May 31, 2024

Cloud secure data lifecycle - "security follows the data"

Data is the most vital component of any system, including cloud environments. Understanding cloud data concepts is critical if you want to secure cloud-based systems.

The figure shows the cloud secure data lifecycle, and its steps are described in the following list.

  • Create: The Create phase covers any circumstance where data is “new.” This new data can be freshly generated content, imported data that is new to the cloud environment, or data that has been modified/updated and has a new shape or state. The Create phase presents the greatest opportunity to classify data according to its sensitivity, ensuring that the right security controls are implemented from the beginning. Decisions made during this phase typically impact the data throughout the entire lifecycle.
Aside from data classification, it’s also important at this stage to consider tagging data with any important attributes, as well as assigning proper access restrictions to the data. Again, what you do during the Create phase usually travels with the data through each of the other phases. So, extra thought should be given to how the created data needs to be managed throughout its lifecycle.

  • Store: The Store phase often happens in tandem with (or immediately after) the Create phase. During this phase, the created or modified data is saved to some digital repository within the application or system. Storage can be in the form of saved files on a filesystem, rows and columns saved to a database, or objects saved in a cloud storage system.
During the Store phase, the classification level assigned during creation is used to assign and implement appropriate security controls. Controls like encryption (at rest), Access Control Lists (ACLs), logging, and monitoring are important during this phase. In addition, this phase is when you should consider how to back up your data to maintain redundancy and availability appropriately. 

  • Use: The Use phase includes any viewing, processing, or consumption of data that was previously in the Store phase. For this model, the Use phase is considered read-only and does not include any modification. (Modifications are covered in the Create phase.)

One important consideration during this phase is that data must be unencrypted while in use. For this reason, the Use phase presents some of the greatest threats to data, if not properly secured. File access monitors, logging and monitoring, and technologies like Information Rights Management (IRM) are important to detect and prevent unauthorised access during the Use phase.

  • Share: During the Share phase, data is made available for use by others, such as employees, customers, and partners. As it’s shared, data often traverses a variety of public and private networks and locations and is subjected to various unique threats along the way. Proper encryption (in transit) is important during this phase, as well as IRM and Data Loss Prevention (DLP) technologies that help ensure sensitive data stays out of the wrong hands.
  • Archive: The Archive phase involves data transitioning from active use to long-term “cold” storage. Archiving can entail moving data from a primary storage tier to a slower, less redundant tier that is less expensive or can include moving data off the cloud to a separate medium altogether (backup tape, for example).
Most data is eventually archived after it’s no longer needed regularly. Once archived, the data must be secured and also remain available for retrieval, when necessary. Legal and regulatory requirements must be carefully considered during the Archive phase, as these requirements may influence how long specific data is required to be stored.

  • Destroy: The final phase of the data lifecycle is the Destroy phase. Destroying data involves completely removing it from the cloud using logical erasure or physical destruction (like disk pulverising or degaussing). In cloud environments, customers generally have to rely on logical destruction methods like crypto-shredding or data overwriting. Still, many CSPs have processes for physical destruction, per contractual agreements and regulatory requirements.

 #> echo "Thank you :)"

Thursday, March 28, 2024

Identifying Information Security fundamentals

  • Pillars of Information Security
Information security is the practice of protecting information by maintaining its confidentiality, integrity, and availability. These three principles form the pillars of information security, and they’re often referred to as the CIA triad

    • Confidentiality

Confidentiality entails limiting access to data to authorized users and systems. In other words, confidentiality prevents the exposure of information to anyone who is not an intended party. 

The concept of confidentiality is closely related to the security best practice of least privilege, which asserts that access to systems or information should only be granted on a need-to-know basis.  To enforce the principle of least privilege and maintain confidentiality, you must classify (or categorize) data by its sensitivity level. 


    • Integrity

Integrity involves maintaining the accuracy, validity, and completeness of information and systems. It ensures that data is not tampered with by anyone other than an authorized party for an authorized purpose. 

A checksum is a value derived from a piece of data that uniquely identifies that data and is used to detect changes that may have been introduced during storage or transmission. Checksums are generated based on cryptographic hashing algorithms and help you validate the integrity of data. 

    • Availability

Availability is all about ensuring that authorized users can access required systems and data when and where they need it 

One of the most common attacks on availability is Distributed Denial of Service, or DDoS, which is a coordinated attack by multiple compromised machines disrupting a system’s availability. Another common and rapidly growing attack on availability is ransomware, which involves an attacker blocking a system or data owners from accessing their systems and data until a sum of money is paid. 

  • Security controls

You know all about confidentiality, integrity, and availability — that’s great! Now, how do you enforce those concepts in your systems? Security control is the specific mechanism or measures implemented to safeguard systems or assets against potential threats and vulnerabilities — said another way, security controls protect the confidentiality, integrity, and availability of your systems and data. 

Security controls can be categorized in a couple of ways: by their type and by their function. 

Types of security control include: 

      • Technical controls use technology (shocking, I know!) to protect information systems and data. Things like firewalls, data loss prevention (DLP) systems, and encryption fall under this category.
      • Physical controls involve the use of physical measures to protect an organization’s assets. This can include things like doors, gates, surveillance cameras, and physical disposal of sensitive information (including things like shredding and degaussing).
      • Administrative controls include the set of policies, procedures, guidelines, and practices that govern the protection of systems and data. This can be anything from incident response plans (see later in this chapter) to security awareness training.
Functions of security controls include:

      • Preventative controls keep negative security events from happening. This includes things like security awareness training, locked doors, and encryption.
      • Detective controls identify negative security events when they do happen. Examples of detective controls include log monitoring and video surveillance.
      • Corrective controls fix or reduce damages associated with a negative security event and may include measures to prevent the same negative event from happening again. Backups and system recovery features are the most common examples of corrective controls.
  • Threats, Vulnerabilities, and Risks
Threats, vulnerabilities, and risks are interrelated terms describing things that may compromise the pillars of information security for given system or an asset (the thing you’re protecting). 
 
    • Threats

A threat is anything capable of intentionally or accidentally compromising an asset’s security. Some examples of common threats include: 

      • Natural disasters: Earthquakes, hurricanes, floods, and fires can cause physical damage to critical infrastructure, leading to loss of connectivity, power outages, or even destruction of systems.
      • Malware: Malicious software such as viruses, worms, and ransomware can infect systems, steal data, or disrupt normal business operations.
      • Phishing attacks: Deceptive emails, messages, or websites designed to trick individuals into revealing sensitive information like passwords, credit card numbers, or personal data.
      • Denial of service (DOS) attacks: Deliberate attempts to overload a network, server, or website with excessive traffic, making it unavailable to legitimate users.
    • Vulnerabilities
A vulnerability is a weakness or gap existing within a system; it’s something that, if not taken care of, may be exploited to compromise an asset’s confidentiality, integrity, or availability. Examples of vulnerabilities include: 
      • Unpatched software: Failure to install updates or patches for operating systems, applications, or firmware, leaving security vulnerabilities open to exploitation.
      • Lack of environmental protection: Missing or faulty fire suppression systems or other physical protections, leaving infrastructure vulnerable to natural disasters and other environmental threats.
      • Insecure passwords: The use of commonly used or otherwise insecure passwords, makes it easier for attackers to gain unauthorized access to accounts or systems.
      • Untrained employees: Lack of security awareness training for employees and system users, leaving them susceptible to phishing attacks.
Threats are pretty harmless without an associated vulnerability, and vice versa. A good fire detection and suppression system gives your data centre a fighting chance, just like (you hope) thorough security awareness training for your organization’s employees will neutralize the threat of an employee clicking on a link in a phishing email. 
 
    • Risks

Risk is used to define the potential for damage or loss of an asset. Risk = Threat x Vulnerability. This simple equation is the cornerstone of risk management. 

Some examples of risks include: 

» A fire wipes out your data centre, making service unavailable for five days.

» A hacker steals half of your customer’s credit card numbers, causing significant reputational damage to your company.

» An attacker gains root privilege through a phishing email and steals your agency’s Top Secret defence intelligence 

  • Identity and Access Management (IAM)

IAM consists of four key elements: identification, authentication, authorization, and accountability. 

    • Identification is the act of establishing who (or what) someone (or something) is. In computing, identification is the process by which you associate an entity (i.e., a system or user) with a unique identity or name, such as a username or email address.
    • Authentication takes identification a step further and validates a user’s identity. During authentication, you answer the question “Are you who you say you are?” before authorizing access to a system.
Authenticators generally fit into one of three factors (or methods): 
      • Something you know: Passwords and PINs (Personal Identification Numbers) fall into this category.
      • Something you have: Security tokens and smart cards are examples of this factor.
      • Something you are: Examples of this factor include fingerprints, iris scans, voice analysis, and other biometric methods
    • Authorization is the process of granting access to a user based on their authenticated identity and the policies you’ve set for them.
    • Accountability involves assigning and holding an entity responsible for its actions within an information system. Accountability requires establishing unique user identities, enforcing strong authentication, and maintaining thorough logs to track user actions

  • Encryption and decryption

Encryption is the process of using an algorithm (or cipher) to convert plaintext (or the original information) into ciphertext. The ciphertext is unreadable unless it goes through the reverse process, known as decryption, which then allows an authorized party to convert the ciphertext back to its original form using the appropriate encryption key(s).  

Types of encryption

Encryption can either be symmetric-key or asymmetric-key. The two encryption types function very differently and are generally used for different applications. 

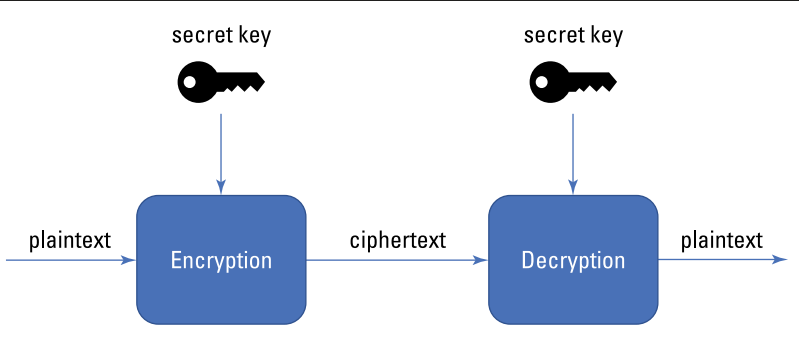
    • Symmetric-key encryption (sometimes referred to as secret-key encryption) uses the same key (called a secret key) for both encryption and decryption (see Figure). Using a single key means the party encrypting the information must give that key to the recipient before they can decrypt the information. The secret key is typically sent to the intended recipient as a message separate from the ciphertext. Symmetric-key encryption is simple, fast, and relatively cheap.
A notable drawback of symmetric-key encryption is it requires a secure channel for the initial key exchange between the encrypting party and the recipient. If your secret key is compromised, the encrypted information is as good posted on a billboard.


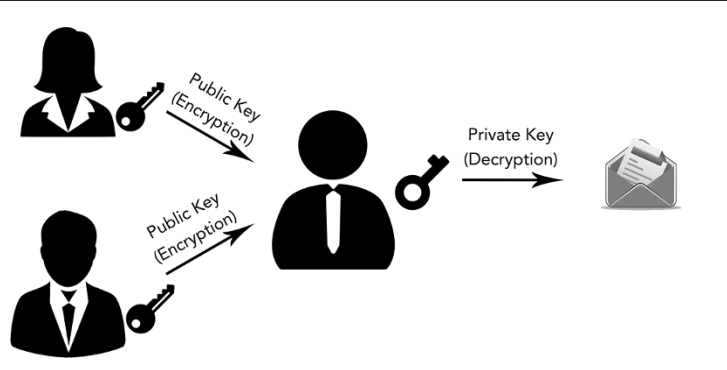
    • Asymmetric-key encryption (more commonly known as public-key encryption) operates by using two keys — one public and one private. The public key, as you might guess, is made publicly available for anyone to encrypt messages. The private key remains a secret of the owner and is required to decrypt messages that come from anyone else (see Figure). Although public-key encryption is typically slower than its counterpart, it removes the need to secretly distribute keys and also has some very important uses                                

Common uses of encryption: Data Protection(in-Rest and in-transit), Authentication and Authorization, Network Security(TLS), Digital Signature, VPN, Crypto-Shredding, etc. 

  • Importance of Business Continuity and Disaster Recovery

Business continuity (BC) refers to the policies, procedures, and tools you put in place to ensure critical business functions continue during and after a disaster or crisis. The goal of business continuity is to allow essential personnel the ability to access important systems and data until the crisis is resolved. 

DR is the part of BC focused on restoring full operation of and access to hardware, software, and data as quickly as possible after a disaster.  

Business continuity broadly focuses on the procedures and systems you have in place to keep a business up and running during and after a disaster. Disaster recovery more narrowly focuses on getting your systems and data back after a crisis hits. 

You need to be aware of a couple important related metrics: 

» Recovery Time Objective (RTO) is the amount of time within which business processes must be restored in order to avoid significant consequences associated with the disaster. In other words, RTO answers the question “How much time can pass before an outage or disruption has unacceptably affected my business?”

» Recovery Point Objective (RPO) is the maximum amount of data loss that’s tolerable to your organization. It answers the question “How much data can I lose before my business is unacceptably impacted by a disaster?” RPO plays an important role in determining frequency of backups.


 #> echo "Thank you :)"

Thursday, February 1, 2024

How to Enable Microsoft 365 Unified Audit Log

  The Unified Audit Log, as the name implies, is a log file in which different activities performed in and through Microsoft 365 are recorded. 

Including the entire list would take up too much space. Still, information within the log includes amongst other things: user and admin activity in Exchange Online, SharePoint Online, OneDrive for Business, Power BI, Microsoft Teams, Stream, Power Apps, etc.

The log contains a lot of useful information that you can use for various activities related to your security operations. It can be used to:

  1. To monitor user behaviour and detect suspicious activities
  2. Perform forensic investigations into actions related to an incident
  3. Monitor specific use cases in your environment through various platforms like Microsoft 365 Defender, Microsoft Defender for Cloud Apps, Azure Monitor, and Microsoft Sentinel.

To enable it through the Microsoft Security Center, navigate to Audit. If the log search is off, then this option should be present. Turning it on is as easy as clicking Turn on auditing.

Alternatively, connect to Exchange Online PowerShell and run the following script. It checks whether the log is already enabled. If it isn’t, it will do so.


if((Get-AdminAuditLogConfig).UnifiedAuditLogIngestionEnabled -ne "True"){
Write-Host "Enabling the Unified Audit Log."
Set-AdminAuditLogConfig -UnifiedAuditLogIngestionEnabled $True }else{
Write-Host "The Unified Audit Log was already enabled."
}


Monday, October 30, 2023

Manage containers in Linux(Part-10)

In Part 9 of the Learning Linux blog series, we learned how to manage the basics of Linux Security systems.

In the final part 10, We will construct basic commands, and understand containers using Podman, and docker in the Linux Operating System.


  • Manage and configure containers
    • docker search nginx(Search images on docker.io repository), 
    • docker pull nginx:1.20.2(Pull the image locally), 
    • docker rmi nginx:1.20.2(remove image), docker images (see the list of images), 
    • docker run -d  -p 8080:80 --name newwebserver nginx (create a container name newwebserver on port mapping 8080 on host and 80 on container with detached mode),
    • docker ps --all (list all running or non-running containers) or docker container list, docker stop container name/id(Stop container), 
    • nc localhost 8080(To confirm if container is accessible on host port), 
  • Perform container management using commands such as podman and skopeo
    • Installing skopeo: yum install skopeo
    • Inspect repositories: skopeo inspect docker://registry.fedoraproject.org/fedora:latest
    • Copying images: skopeo copy docker://quay.io/buildah/stable docker://registry.kodekloud.com/buidah, skopeo copy oci:busybox_ocilayout:latest dir:myemptydirectory
    • Deleting Image: skopeo delete docker://localhost:5000/imagename:latest(delete image)
    • Syncing registries: skopeo sync --src docker --dest dir registry.kodekloud.com/busybox /media/usb  
    • man skopeo(Manual page)
  • Configure a container to start automatically as a systemd service and attach persistent storage 

  1. mkdir -p ~/.config/systemd/user (Create dir structure to hold the folder for service unit files),
  2. podman run -d --name container_service -p 1025:8080 -v ~/container_storage:/var/www/html:Z registry.access.redhat.com/rhscl/httpd-24-rhel7 (Attaching a local folder to container), 
  3. podman generate systemd --name container_service --files --new (Generating systemd service unit files for container), 
  4. loginctl enable-linger <username>(To allow local user to run a service with systems), 
  5. export XDG_RUNTIME_DIR=/run/user/$(id -u) 
  6. systemctl --user daemon-reload, 
  7. systemctl --user  enable --now container-container_service.service (To allow container to run on boot),


Wednesday, August 30, 2023

Manage Security in Linux(Part-9)

   In Part 8 of the Learning Linux blog series, we learned how to configure and manage users and groups in Linux systems.

In part 9, We will construct basic commands, and understand security in the Linux Operating System.


  • Configure key-based authentication for SSH
    • ssh-keygen (This process will generate private and public keys(id_rsa, id_rsa.pub)
    • ssh-copy-id aaron@10.11.12.9 (This will copy the public key on the target ip under .ssh/authotized_keys files, or you can manually login to target server and add the public key on .ssh/authorized_keys file)
    • SSH Server Conf file - /etc/ssh/sshd_config, SSH Client Conf File - /etc/ssh/ssh_conf, Custom ssh client Conf file dir path - /etc/ssh/ssh_config.d/
  • List and Identify the SELinux file and process contexts
    • getenforce (To view the SE Linux mode), 
    • ls -Z (see the file/folder se context), unconfined_u:object_r:user_home_t:s0(user:role:type:level), 
    • id -Z (TO see the current user logged with se context view), 
    • sudo semanage login -l (To view the user' se context)
    • sudo semanage user -l (To view the se roles assigned to each user ids),
  • Change kernel runtime parameters, persistent and non-persistent
    • sudo sysctl -a (List kernel runtime parameters), 
    • sudo sysctl -w 'paramter=1/0' (non-persistence change),
    • sudo vi /etc/sysctl.d/swap-less.conf (Persistence change at this conf folder location), 
    • sudo sysctl -p 'conf. file path' (This will apply the changes without reboot), 
    • sudo chcon -t httpd_sys_content_t /var/index.html (Set se linux contex)
  • Restore default file contexts
    • enforcing=0 (GRUB Paramter to boot Linux into Permissive mode), 
    • selinux=0 (Kernel will not do anything related to SE Linux and post-reboot it will perform autorelabel. Setting this parameter in GRUB Conf. will cause it to perform autorelebel=1 for all files), 
    • autorelebel=1 (relabel all files)
  • Diagnose and troubleshoot SE Linux Policy Violation:
    • Scenario1: Httpd process stoped post changing listining port,
      • ausearch -c 'httpd' --raw | audit2allow -M m-httpd (Create Policy set),
      • semodule -i my-httpd.pp (enforce this policy)
    • Scenario2: Chaning the root httpd file path
      • grep 'httpd' /var/log/messages | less (search se linux related error message), 
      • semanage fcontext -a -t httpd_sys_content_t "/Directoty(/.*)?" (Change the files SE context type to service httpd se account type)
      • restorecon -R /Directory/ (To restore the new contexts for directory)
#> echo "Thank you :)"

Thursday, July 27, 2023

Manage Users and Groups(Part-8)

  In Part-7 of the Learning Linux blog series, we learned how to configure and manage basic networking in Linux Systems.

In part 8, We will construct basic commands to manage users and groups in the Linux Operating System.

  • Create, delete, and modify local user accounts
    • Create UserId: 
      • sudo useradd john (create a new user john with primary group as same john and assign home directory path, /bin/bash shell environment), 
      • sudo passwd john(set new password), 
      • sudo userdel john(delete user john without removing home/malspool, --remove should be used if you want to remove home dir), 
      • sudo useradd --shell /bin/othershell --home-dir /home/otherdir john, 
      • sudo useradd -s /bin/othershell john(just changing the default shell), 
      • sudo useradd --system systemacc(Add service/system account)
    • Local user accounts: 
      • cat /etc/passwd(this file store the userid details), 
      • sudo id (list the users who are signed-in), 
      • whoami(To see your current login userid detail), 
    • Modify users: 
      • sudo usermod --home /home/otherdir --move-home john (Modify the home dir),
      • sudo usermod --login jane john(Change username),
      • sudo usermod --shell /bin/othershell jane(change the default shell), 
      • sudo usermod -lock jane(lock/disable the account without deleting it), 
      • sudo usermod -unlock jane(unlock the account), 
      • sudo usermod --expiredate 2021-12-10(Set expire date for account), 
      • sudo chage --lastday 0 jane(set account's password to expire immediately or put -1 to un-expire it, --maxdays for set password expire days, -1 value means neverexpire),
      • sudo chage --list(To see the accounts expiration), 
    • Delete User/grp: 
      • sudo userdel -r jane, sudo groupdel john
  • Create, delete, and modify local groups and group memberships
    • Local group and membership: 
      • sudo gpasswd --add john developers(add john on developers group as secondary/supplementary), 
      • groups john(list the group membership for user john), 
      • sudo gpasswd --delete john developers(remove user from group), 
      • sudo usermod -gid developers john(Change the primary group for user john to developers),  
    • Modify group: 
      • sudo groupmod --new-name programmers developers(rename group),  
      • sudo groupdel programmers(Delete Group), 
  • Manage access to the root account
      • sudo --login or sudo -i(loging as root user if you're a sudo user), 
      • su --login or su -l(If you know the root password and does not member pf sudo), 
      • sudo passwd --unlock root(unlock the root account if it was locke, --lock to lock it again but ssh key login will still work),
  • Configure PAM(Pluggable Authentication Module)
    • man pam(list the pam modules and their help documentation), man pam.conf(To see the pam configuration help doc),
      • ls /etc/pam.d/ (list the pam related conf files), 

Note: Use the Linux manual using "man <command)" or "command --help" to access the command documentation for more detail. 

#> echo "Thank you :)"

Saturday, June 24, 2023

Manage Basic Networking(Part-7)

 In Part-6 of the Learning Linux blog series, we learned how to configure and maintain Linux Systems.

In part 7, We will understand and manage the basic networking features.

- Configure networking and hostname resolution statically or dynamically

ip link show (Show the list of IP Interfaces), 

IP address show (Show the IP addresses)

        ip route show (Shows the routing table), 

cat /etc/resolve.conf (show the DNS server IP Address)

NetworkManager: NetworkManager is a daemon that sits on top of libudev and other Linux kernel interfaces and provides a high-level interface for the configuration of the network interfaces.

        Configure Network Interface:

        sudo nmtui (Step1 - Launch GUI version of NM, Modify the IP as you like), 

sudo nmcli device reapply ensps03(Step2 - enforce the changes forcefully),  

          sudo vi /etc/sysconfig/network-scripts/adaptername (Use this for CentOS 7 and earlier)

Host resolution: Host file

Sudo vi /etc/hosts (Use this file for manually putting host entry for hostname resolution locally)


- Configure network services to start automatically at boot

sudo systemctl status NetworkManager.service(Confirm if the NM Service is already installed)

Starting Network service at the boot time: 

sudo nmcli connection modify ens0ps3 autoconnect yes (Set to start network adapter at boot time), 


- Start, stop, and check the status of network services

ss and netstat: ss or netstat is used to dump socket statistics. ss is faster and provides more detailed information, making it the preferred choice for network analysis and troubleshooting in Linux. However, netstat is more widely available and provides a more comprehensive output. In conclusion, both ss and netstat are valuable tools for network analysis and troubleshooting.


sudo ss -ltunp 


- Implement packet filtering

firewall-cmd --get-default-zone (show the default zones details)

firewall-cmd --list-all (list all ports or service details), 

sudo firewall-cmd --info-service=cockpit (show the port for allowed service),  

sudo firewall-cmd --remove-service=http (remove service), 

sudo firewall-cmd --remove-port=80/tcp (remove port), 

sudo firewall-cmd --add-source/--remove-source=10.11.12.0/24 --zone=trusted (Add or remove source network in trusted zone), 

sudo firewall-cmd --get-active-zones (list all active zones)

Make the firewall changes permanent:

1st: sudo firewall-cmd --add-port=80/http (Allow port 80 on dynamic for current session), 

sudo firewall-cmd --runetime-to-permanent (save the conf changes permanently),

2nd:  sudo firewall-cmd --add-port=80/http --permanent (does not make active for the current session but makes permanent)


- Statically route IP traffic

sudo ip route add 192.168.0.0/24 vi 10.0.0.100 (adding route to move traffic for target network via gw),  

        sudo ip route add 192.168.0.0/24 vi 10.0.0.100 dev enp0s3 (adding route to move traffic for target network via gw using device enp0s3),  

sudo ip route del 192.168.0.0/24(delete route), 

sudo ip route add default via 10.0.0.100 (set gw for all traffic), 

Add route permanently using Network Manager:

nmcli connection show(show the nm device interface), 

        sudo nmcli connection modify enp0s3 +ipv4.routes "192.168.0.0/24 10.0.0.100" ( Add the route - step1)

sudo nmcli device reapply enp0s3 (apply the settings - step2)

sudo ip route show (Confirm the change in the routing table)

Remove ip route: 

        sudo nmcli connection modify enp0s3 -ipv4.routes "192.168.0.0/24 10.0.0.100",  (step1)

sudo nmcli device reapply enp0s3 (then re-apply the settings)

GUI Method: sudo nmtui, 

sudo nmcli device reapply enp0s3(then re-apply the settings)


- Configure time service clients

chrony daemon (Daemon for sync clock), timedatact, 

Setup the time & zone: 

sudo timedatectl list-timezones (show all zones),  

sudo timedatactl set-timezone America/New_York ( Set time zone to America/New_York)

• Configure chronyd service: 

sudo yum install chrony, (Step1 - Intall chrony daemon if not present)

sudo systemctl start chronyd.service, (Step2 - Start the Chrony Daemon) 

sudo timedatactl set-ntp true (Enable the NTP)


Note: Use the Linux manual using "man <command)" or "command --help" to access the command documentation for more detail. 


#> echo "Thank you :)"