Saturday, May 23, 2026

The Three Pillars of AI Architecture Security

Artificial Intelligence is no longer experimental. Organizations are rapidly integrating Large Language Models (LLMs), Generative AI platforms, AI copilots, and intelligent automation into customer-facing applications, internal operations, cybersecurity tooling, and decision-making systems.

While AI adoption accelerates innovation, it also introduces an entirely new attack surface.

To successfully mitigate risk, security engineers must decouple the AI application stack into three distinct operational domains: Training Data, the AI Model Core, and the Application Input/Output (I/O) System. Each domain exhibits unique vulnerabilities and demands isolated security controls. 

The following architecture highlights the separation between training data, AI engineering, AI models, application infrastructure, and application input/output systems.

1. Training Data Domain

The integrity of an AI model is inextricably bound to its training data. Attackers targeting this phase aim to manipulate downstream model behaviour via data poisoning or to harvest sensitive intellectual property embedded in the dataset.

    • Data Provenance & Lineage: Implement cryptographic hashing and strict tracking of training corpus origins.
  • Sanitisation & Anonymisation: Deploy automated PII scrubbing, hashing, and differential privacy filtering.
  • Supply Chain Validation: Conduct rigorous auditing of external third-party datasets and open-source packages.

2. The AI Model Core

The model core represents the compiled intelligence of the system. If an attacker can manipulate the model weights or exploit deserialization vulnerabilities in model formats (such as unpickling legacy .pkl files), they gain complete control over system inference.

  • Weights & Artifact Integrity: Sign model weights cryptographically; enforce strict Role-Based Access Control (RBAC) on model registries (such as MLflow).
  • Runtime Isolation: Execute model inference inside ephemeral, network-isolated sandboxes or secure containers.
  • Inference Rate-Limiting: Throttle requests to prevent side-channel inversion and model extraction attacks.

3. Application Input/Output (I/O) System

The I/O system is the dynamic perimeter where users interface with the LLM. It is the primary vector for runtime exploits such as prompt injection. Because LLMs process instructions and data within the exact same context window, a robust architecture must treat all inputs as untrusted data strings.

  • Prompt Firewalls & Filters: Deploy heuristic and LLM-based guardrails (e.g., NeMo Guardrails) to intercept adversarial prompts before they reach the main context window.
  • Contextual Output Sanitisation: Validate, parse, and escape model outputs before rendering them to user interfaces or passing them to downstream APIs.
  • Least-Privilege Tool Execution: Enforce absolute RBAC and tight token scoping on downstream tools, web search plugins, and database agents.


Final Thoughts

AI is rapidly transforming enterprise technology, but innovation without security creates significant business risk.

Organisations must secure:

  • Training data
  • AI engineering pipelines
  • AI models
  • Input channels
  • Output systems
  • Application infrastructure

The OWASP Top 10 for LLM framework provides an excellent foundation for building secure, resilient, and trustworthy AI systems.

Enterprises that embed AI security into architecture, governance, DevSecOps, and operations from the beginning will be better positioned to scale AI safely and responsibly.

AI security is no longer optional.

It is now a core pillar of enterprise cybersecurity strategy.

-> echo "Thank You :) "

Thursday, October 17, 2024

Essential Linux commands for various system administration tasks

In this blog post, I am trying to consolidate common commands available to manage the Linux Operating System. If you are looking for more detail info, you can either refer my previous Linux blog series(Part1 to 10) or use manual pages available for each commands using command -- man <command>


In Linux, there are several commands available to manage files, users, processes, networking, packages, and system settings. Below is a categorized list of essential Linux commands for various system management tasks:


1. File and Directory Management:

  • ls: Lists files and directories.
  • cd: Changes the current directory.
  • pwd: Prints the current working directory.
  • cp: Copies files or directories.
  • mv: Moves or renames files or directories.
  • rm: Removes files or directories.
  • mkdir: Creates directories.
  • rmdir: Removes empty directories.
  • find: Searches for files in a directory hierarchy.
  • touch: Creates an empty file or updates the timestamp of an existing file.
  • ln: Creates hard and symbolic links.

2. File Permissions and Ownership:

  • chmod: Changes file permissions.
  • chown: Changes file owner and group.
  • chgrp: Changes the group ownership of a file.
  • umask: Sets default file permissions.
  • stat: Displays detailed file or file system status, including permissions.

3. Process Management:

  • ps: Displays information about active processes.
  • top or htop: Provides a dynamic view of running processes.
  • kill: Sends signals (e.g., to terminate) to processes.
  • killall: Kills all processes by name.
  • nice: Starts a process with a defined priority.
  • renice: Changes the priority of a running process.
  • jobs: Lists background jobs in the current shell.
  • bg: Resumes a job in the background.
  • fg: Brings a background job to the foreground.

4. Disk and Storage Management:

  • df: Shows disk space usage.
  • du: Displays the amount of disk space used by files and directories.
  • mount: Mounts a file system.
  • umount: Unmounts a file system.
  • fdisk: Disk partitioning tool.
  • parted: Another disk partitioning tool with advanced features.
  • mkfs: Creates a file system on a disk partition.
  • fsck: File system consistency check and repair.
  • lsblk: Lists information about block devices.
  • blkid: Displays block device attributes (UUID, file system type).
  • sync: Synchronizes cached writes to persistent storage.

5. Networking:

  • ifconfig: Configures network interfaces (deprecated, replaced by ip).
  • ip: Manages network interfaces, routing, and more.
  • ping: Tests network connectivity to a host.
  • netstat: Displays network connections, routing tables, and more (replaced by ss).
  • ss: Provides detailed socket statistics.
  • traceroute: Shows the path packets take to reach a host.
  • nslookup: Queries DNS to obtain domain name or IP address mapping.
  • dig: Performs DNS lookups.
  • scp: Securely copies files between hosts over the network.
  • rsync: Synchronizes files and directories between two locations over a network.
  • iptables: Configures firewall rules (replaced by nftables on many systems).
  • nft: Manages packet filtering and network address translation (NAT).

6. User and Group Management:

  • useradd: Adds a new user.
  • usermod: Modifies user account properties.
  • userdel: Deletes a user account.
  • groupadd: Adds a new group.
  • groupmod: Modifies a group.
  • groupdel: Deletes a group.
  • passwd: Changes the password for a user.
  • who: Shows who is logged in.
  • w: Shows detailed information about who is logged in and what they are doing.
  • last: Displays the last logins of users.

7. System Monitoring and Performance:

  • uptime: Shows system uptime and load averages.
  • free: Displays memory usage.
  • vmstat: Reports virtual memory statistics.
  • iostat: Reports CPU and I/O statistics.
  • sar: Collects and reports system activity information.
  • dmesg: Prints kernel ring buffer messages (used for debugging hardware and kernel issues).
  • lsof: Lists open files and the processes using them.

8. Package Management:

  • Debian-based systems (e.g., Ubuntu):
    • apt: Manages packages (install, remove, update).
    • apt-get: Another package manager (more script-friendly).
    • dpkg: Manages individual Debian packages.
  • Red Hat-based systems (e.g., RHEL, CentOS):
    • yum: Manages packages (install, update, remove) (replaced by dnf).
    • dnf: Next-generation package manager for Red Hat-based systems.
    • rpm: Manages individual RPM packages.
  • Arch-based systems (e.g., Arch, Manjaro):
    • pacman: Manages packages for Arch Linux and its derivatives.

9. Service and System Management:

  • systemctl: Controls system services (start, stop, restart, enable, disable).
  • service: Manages services (older systems, replaced by systemctl).
  • journalctl: Views and manages systemd logs.
  • crontab: Schedules periodic tasks (cron jobs).
  • at: Schedules one-time tasks.
  • shutdown: Shuts down or restarts the system.
  • reboot: Reboots the system.

10. Security and Permissions:

  • sudo: Executes commands as another user (usually root).
  • su: Switches to another user (e.g., root).
  • gpasswd: Administers /etc/group (group management).
  • iptables/nft: Configures firewall rules.
  • semanage: Manages SELinux settings (on systems with SELinux).

11. Archiving and Compression:

  • tar: Archives multiple files into a single file and optionally compresses them.
  • gzip: Compresses files using the gzip algorithm.
  • gunzip: Decompresses files compressed with gzip.
  • zip: Compresses files into a ZIP archive.
  • unzip: Extracts files from a ZIP archive.
  • bzip2/bunzip2: Compresses and decompresses files using the bzip2 algorithm.
  • xz: Compresses files using the xz algorithm.

12. Backup and Recovery:

  • rsync: Efficiently synchronizes files and directories between locations.
  • dd: Creates low-level copies of data, useful for backup and disk imaging.
  • tar: Archives files for backup purposes.
  • cpio: Copies files into and out of archives.


These are just some of the commonly used Linux commands for managing different aspects of the system. Depending on your Linux distribution and the tasks you're performing, you might encounter additional tools specific to that system.

-> echo "Thank You :) "

Tuesday, July 23, 2024

The Installation failed in the FIRST_BOOT phase with an error during SYSPREP operation

 Hi there,

Recently, I was working on a Windows server 2012 R2 upgrade to Windows server 2019. Some of the servers failed to upgrade after 51% with an error message - "The Installation failed in the FIRST_BOOT phase with an error during SYSPREP operation"


After digging further in the setup logs ($WINDOWS.~BT\Sources\Panther\setupact.log), I found these lines(Below screenshot) at the end of the log file which clearly indicates that the setup was failing to upgrade the rdweb component. 

The log file(setupact.log) will be accessible from C:\ drive. you will able to find it under a hidden folder - $WINDOWS.~BT 


To make it work, I had to remove the RDS-Web-Access feature from PowerShell using the below command 

Remove-WindowsFeature -Name RDS-Web-Access

After removing the rds-web-access feature, the upgrade was completed successfully.


Note: You might have to reconfigure the RD-web page or restore from the old backup. (Please comment if you found any alternative option to restore the web form.)


 #> echo "Thank you :)"


Friday, May 31, 2024

Cloud secure data lifecycle - "security follows the data"

Data is the most vital component of any system, including cloud environments. Understanding cloud data concepts is critical if you want to secure cloud-based systems.

The figure shows the cloud secure data lifecycle, and its steps are described in the following list.

  • Create: The Create phase covers any circumstance where data is “new.” This new data can be freshly generated content, imported data that is new to the cloud environment, or data that has been modified/updated and has a new shape or state. The Create phase presents the greatest opportunity to classify data according to its sensitivity, ensuring that the right security controls are implemented from the beginning. Decisions made during this phase typically impact the data throughout the entire lifecycle.
Aside from data classification, it’s also important at this stage to consider tagging data with any important attributes, as well as assigning proper access restrictions to the data. Again, what you do during the Create phase usually travels with the data through each of the other phases. So, extra thought should be given to how the created data needs to be managed throughout its lifecycle.

  • Store: The Store phase often happens in tandem with (or immediately after) the Create phase. During this phase, the created or modified data is saved to some digital repository within the application or system. Storage can be in the form of saved files on a filesystem, rows and columns saved to a database, or objects saved in a cloud storage system.
During the Store phase, the classification level assigned during creation is used to assign and implement appropriate security controls. Controls like encryption (at rest), Access Control Lists (ACLs), logging, and monitoring are important during this phase. In addition, this phase is when you should consider how to back up your data to maintain redundancy and availability appropriately. 

  • Use: The Use phase includes any viewing, processing, or consumption of data that was previously in the Store phase. For this model, the Use phase is considered read-only and does not include any modification. (Modifications are covered in the Create phase.)

One important consideration during this phase is that data must be unencrypted while in use. For this reason, the Use phase presents some of the greatest threats to data, if not properly secured. File access monitors, logging and monitoring, and technologies like Information Rights Management (IRM) are important to detect and prevent unauthorised access during the Use phase.

  • Share: During the Share phase, data is made available for use by others, such as employees, customers, and partners. As it’s shared, data often traverses a variety of public and private networks and locations and is subjected to various unique threats along the way. Proper encryption (in transit) is important during this phase, as well as IRM and Data Loss Prevention (DLP) technologies that help ensure sensitive data stays out of the wrong hands.
  • Archive: The Archive phase involves data transitioning from active use to long-term “cold” storage. Archiving can entail moving data from a primary storage tier to a slower, less redundant tier that is less expensive or can include moving data off the cloud to a separate medium altogether (backup tape, for example).
Most data is eventually archived after it’s no longer needed regularly. Once archived, the data must be secured and also remain available for retrieval, when necessary. Legal and regulatory requirements must be carefully considered during the Archive phase, as these requirements may influence how long specific data is required to be stored.

  • Destroy: The final phase of the data lifecycle is the Destroy phase. Destroying data involves completely removing it from the cloud using logical erasure or physical destruction (like disk pulverising or degaussing). In cloud environments, customers generally have to rely on logical destruction methods like crypto-shredding or data overwriting. Still, many CSPs have processes for physical destruction, per contractual agreements and regulatory requirements.

 #> echo "Thank you :)"

Thursday, March 28, 2024

Identifying Information Security fundamentals

  • Pillars of Information Security
Information security is the practice of protecting information by maintaining its confidentiality, integrity, and availability. These three principles form the pillars of information security, and they’re often referred to as the CIA triad

    • Confidentiality

Confidentiality entails limiting access to data to authorized users and systems. In other words, confidentiality prevents the exposure of information to anyone who is not an intended party. 

The concept of confidentiality is closely related to the security best practice of least privilege, which asserts that access to systems or information should only be granted on a need-to-know basis.  To enforce the principle of least privilege and maintain confidentiality, you must classify (or categorize) data by its sensitivity level. 


    • Integrity

Integrity involves maintaining the accuracy, validity, and completeness of information and systems. It ensures that data is not tampered with by anyone other than an authorized party for an authorized purpose. 

A checksum is a value derived from a piece of data that uniquely identifies that data and is used to detect changes that may have been introduced during storage or transmission. Checksums are generated based on cryptographic hashing algorithms and help you validate the integrity of data. 

    • Availability

Availability is all about ensuring that authorized users can access required systems and data when and where they need it 

One of the most common attacks on availability is Distributed Denial of Service, or DDoS, which is a coordinated attack by multiple compromised machines disrupting a system’s availability. Another common and rapidly growing attack on availability is ransomware, which involves an attacker blocking a system or data owners from accessing their systems and data until a sum of money is paid. 

  • Security controls

You know all about confidentiality, integrity, and availability — that’s great! Now, how do you enforce those concepts in your systems? Security control is the specific mechanism or measures implemented to safeguard systems or assets against potential threats and vulnerabilities — said another way, security controls protect the confidentiality, integrity, and availability of your systems and data. 

Security controls can be categorized in a couple of ways: by their type and by their function. 

Types of security control include: 

      • Technical controls use technology (shocking, I know!) to protect information systems and data. Things like firewalls, data loss prevention (DLP) systems, and encryption fall under this category.
      • Physical controls involve the use of physical measures to protect an organization’s assets. This can include things like doors, gates, surveillance cameras, and physical disposal of sensitive information (including things like shredding and degaussing).
      • Administrative controls include the set of policies, procedures, guidelines, and practices that govern the protection of systems and data. This can be anything from incident response plans (see later in this chapter) to security awareness training.
Functions of security controls include:

      • Preventative controls keep negative security events from happening. This includes things like security awareness training, locked doors, and encryption.
      • Detective controls identify negative security events when they do happen. Examples of detective controls include log monitoring and video surveillance.
      • Corrective controls fix or reduce damages associated with a negative security event and may include measures to prevent the same negative event from happening again. Backups and system recovery features are the most common examples of corrective controls.
  • Threats, Vulnerabilities, and Risks
Threats, vulnerabilities, and risks are interrelated terms describing things that may compromise the pillars of information security for given system or an asset (the thing you’re protecting). 
 
    • Threats

A threat is anything capable of intentionally or accidentally compromising an asset’s security. Some examples of common threats include: 

      • Natural disasters: Earthquakes, hurricanes, floods, and fires can cause physical damage to critical infrastructure, leading to loss of connectivity, power outages, or even destruction of systems.
      • Malware: Malicious software such as viruses, worms, and ransomware can infect systems, steal data, or disrupt normal business operations.
      • Phishing attacks: Deceptive emails, messages, or websites designed to trick individuals into revealing sensitive information like passwords, credit card numbers, or personal data.
      • Denial of service (DOS) attacks: Deliberate attempts to overload a network, server, or website with excessive traffic, making it unavailable to legitimate users.
    • Vulnerabilities
A vulnerability is a weakness or gap existing within a system; it’s something that, if not taken care of, may be exploited to compromise an asset’s confidentiality, integrity, or availability. Examples of vulnerabilities include: 
      • Unpatched software: Failure to install updates or patches for operating systems, applications, or firmware, leaving security vulnerabilities open to exploitation.
      • Lack of environmental protection: Missing or faulty fire suppression systems or other physical protections, leaving infrastructure vulnerable to natural disasters and other environmental threats.
      • Insecure passwords: The use of commonly used or otherwise insecure passwords, makes it easier for attackers to gain unauthorized access to accounts or systems.
      • Untrained employees: Lack of security awareness training for employees and system users, leaving them susceptible to phishing attacks.
Threats are pretty harmless without an associated vulnerability, and vice versa. A good fire detection and suppression system gives your data centre a fighting chance, just like (you hope) thorough security awareness training for your organization’s employees will neutralize the threat of an employee clicking on a link in a phishing email. 
 
    • Risks

Risk is used to define the potential for damage or loss of an asset. Risk = Threat x Vulnerability. This simple equation is the cornerstone of risk management. 

Some examples of risks include: 

» A fire wipes out your data centre, making service unavailable for five days.

» A hacker steals half of your customer’s credit card numbers, causing significant reputational damage to your company.

» An attacker gains root privilege through a phishing email and steals your agency’s Top Secret defence intelligence 

  • Identity and Access Management (IAM)

IAM consists of four key elements: identification, authentication, authorization, and accountability. 

    • Identification is the act of establishing who (or what) someone (or something) is. In computing, identification is the process by which you associate an entity (i.e., a system or user) with a unique identity or name, such as a username or email address.
    • Authentication takes identification a step further and validates a user’s identity. During authentication, you answer the question “Are you who you say you are?” before authorizing access to a system.
Authenticators generally fit into one of three factors (or methods): 
      • Something you know: Passwords and PINs (Personal Identification Numbers) fall into this category.
      • Something you have: Security tokens and smart cards are examples of this factor.
      • Something you are: Examples of this factor include fingerprints, iris scans, voice analysis, and other biometric methods
    • Authorization is the process of granting access to a user based on their authenticated identity and the policies you’ve set for them.
    • Accountability involves assigning and holding an entity responsible for its actions within an information system. Accountability requires establishing unique user identities, enforcing strong authentication, and maintaining thorough logs to track user actions

  • Encryption and decryption

Encryption is the process of using an algorithm (or cipher) to convert plaintext (or the original information) into ciphertext. The ciphertext is unreadable unless it goes through the reverse process, known as decryption, which then allows an authorized party to convert the ciphertext back to its original form using the appropriate encryption key(s).  

Types of encryption

Encryption can either be symmetric-key or asymmetric-key. The two encryption types function very differently and are generally used for different applications. 

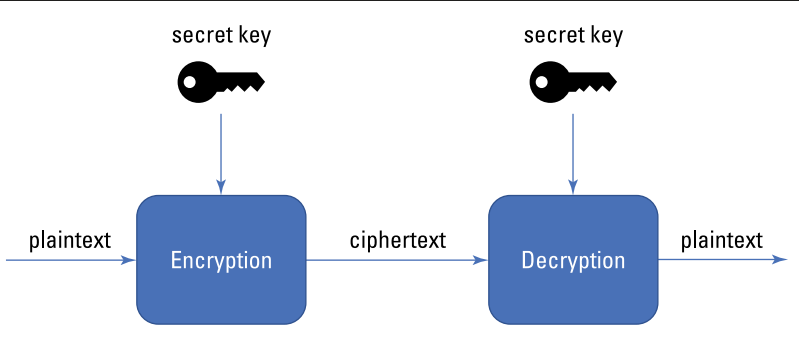
    • Symmetric-key encryption (sometimes referred to as secret-key encryption) uses the same key (called a secret key) for both encryption and decryption (see Figure). Using a single key means the party encrypting the information must give that key to the recipient before they can decrypt the information. The secret key is typically sent to the intended recipient as a message separate from the ciphertext. Symmetric-key encryption is simple, fast, and relatively cheap.
A notable drawback of symmetric-key encryption is it requires a secure channel for the initial key exchange between the encrypting party and the recipient. If your secret key is compromised, the encrypted information is as good posted on a billboard.


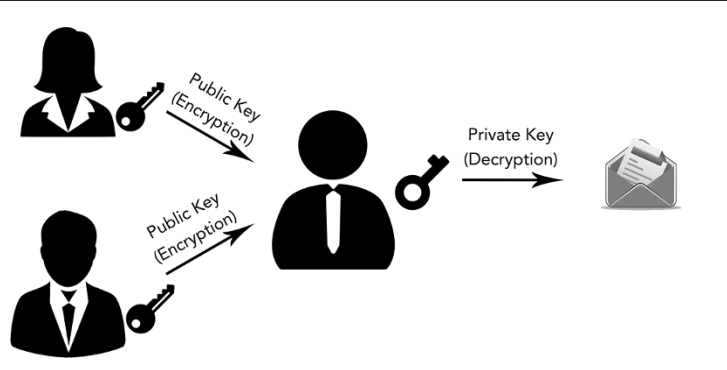
    • Asymmetric-key encryption (more commonly known as public-key encryption) operates by using two keys — one public and one private. The public key, as you might guess, is made publicly available for anyone to encrypt messages. The private key remains a secret of the owner and is required to decrypt messages that come from anyone else (see Figure). Although public-key encryption is typically slower than its counterpart, it removes the need to secretly distribute keys and also has some very important uses                                

Common uses of encryption: Data Protection(in-Rest and in-transit), Authentication and Authorization, Network Security(TLS), Digital Signature, VPN, Crypto-Shredding, etc. 

  • Importance of Business Continuity and Disaster Recovery

Business continuity (BC) refers to the policies, procedures, and tools you put in place to ensure critical business functions continue during and after a disaster or crisis. The goal of business continuity is to allow essential personnel the ability to access important systems and data until the crisis is resolved. 

DR is the part of BC focused on restoring full operation of and access to hardware, software, and data as quickly as possible after a disaster.  

Business continuity broadly focuses on the procedures and systems you have in place to keep a business up and running during and after a disaster. Disaster recovery more narrowly focuses on getting your systems and data back after a crisis hits. 

You need to be aware of a couple important related metrics: 

» Recovery Time Objective (RTO) is the amount of time within which business processes must be restored in order to avoid significant consequences associated with the disaster. In other words, RTO answers the question “How much time can pass before an outage or disruption has unacceptably affected my business?”

» Recovery Point Objective (RPO) is the maximum amount of data loss that’s tolerable to your organization. It answers the question “How much data can I lose before my business is unacceptably impacted by a disaster?” RPO plays an important role in determining frequency of backups.


 #> echo "Thank you :)"

Thursday, February 1, 2024

How to Enable Microsoft 365 Unified Audit Log

  The Unified Audit Log, as the name implies, is a log file in which different activities performed in and through Microsoft 365 are recorded. 

Including the entire list would take up too much space. Still, information within the log includes amongst other things: user and admin activity in Exchange Online, SharePoint Online, OneDrive for Business, Power BI, Microsoft Teams, Stream, Power Apps, etc.

The log contains a lot of useful information that you can use for various activities related to your security operations. It can be used to:

  1. To monitor user behaviour and detect suspicious activities
  2. Perform forensic investigations into actions related to an incident
  3. Monitor specific use cases in your environment through various platforms like Microsoft 365 Defender, Microsoft Defender for Cloud Apps, Azure Monitor, and Microsoft Sentinel.

To enable it through the Microsoft Security Center, navigate to Audit. If the log search is off, then this option should be present. Turning it on is as easy as clicking Turn on auditing.

Alternatively, connect to Exchange Online PowerShell and run the following script. It checks whether the log is already enabled. If it isn’t, it will do so.


if((Get-AdminAuditLogConfig).UnifiedAuditLogIngestionEnabled -ne "True"){
Write-Host "Enabling the Unified Audit Log."
Set-AdminAuditLogConfig -UnifiedAuditLogIngestionEnabled $True }else{
Write-Host "The Unified Audit Log was already enabled."
}


Monday, October 30, 2023

Manage containers in Linux(Part-10)

In Part 9 of the Learning Linux blog series, we learned how to manage the basics of Linux Security systems.

In the final part 10, We will construct basic commands, and understand containers using Podman, and docker in the Linux Operating System.


  • Manage and configure containers
    • docker search nginx(Search images on docker.io repository), 
    • docker pull nginx:1.20.2(Pull the image locally), 
    • docker rmi nginx:1.20.2(remove image), docker images (see the list of images), 
    • docker run -d  -p 8080:80 --name newwebserver nginx (create a container name newwebserver on port mapping 8080 on host and 80 on container with detached mode),
    • docker ps --all (list all running or non-running containers) or docker container list, docker stop container name/id(Stop container), 
    • nc localhost 8080(To confirm if container is accessible on host port), 
  • Perform container management using commands such as podman and skopeo
    • Installing skopeo: yum install skopeo
    • Inspect repositories: skopeo inspect docker://registry.fedoraproject.org/fedora:latest
    • Copying images: skopeo copy docker://quay.io/buildah/stable docker://registry.kodekloud.com/buidah, skopeo copy oci:busybox_ocilayout:latest dir:myemptydirectory
    • Deleting Image: skopeo delete docker://localhost:5000/imagename:latest(delete image)
    • Syncing registries: skopeo sync --src docker --dest dir registry.kodekloud.com/busybox /media/usb  
    • man skopeo(Manual page)
  • Configure a container to start automatically as a systemd service and attach persistent storage 

  1. mkdir -p ~/.config/systemd/user (Create dir structure to hold the folder for service unit files),
  2. podman run -d --name container_service -p 1025:8080 -v ~/container_storage:/var/www/html:Z registry.access.redhat.com/rhscl/httpd-24-rhel7 (Attaching a local folder to container), 
  3. podman generate systemd --name container_service --files --new (Generating systemd service unit files for container), 
  4. loginctl enable-linger <username>(To allow local user to run a service with systems), 
  5. export XDG_RUNTIME_DIR=/run/user/$(id -u) 
  6. systemctl --user daemon-reload, 
  7. systemctl --user  enable --now container-container_service.service (To allow container to run on boot),


Wednesday, August 30, 2023

Manage Security in Linux(Part-9)

   In Part 8 of the Learning Linux blog series, we learned how to configure and manage users and groups in Linux systems.

In part 9, We will construct basic commands, and understand security in the Linux Operating System.


  • Configure key-based authentication for SSH
    • ssh-keygen (This process will generate private and public keys(id_rsa, id_rsa.pub)
    • ssh-copy-id aaron@10.11.12.9 (This will copy the public key on the target ip under .ssh/authotized_keys files, or you can manually login to target server and add the public key on .ssh/authorized_keys file)
    • SSH Server Conf file - /etc/ssh/sshd_config, SSH Client Conf File - /etc/ssh/ssh_conf, Custom ssh client Conf file dir path - /etc/ssh/ssh_config.d/
  • List and Identify the SELinux file and process contexts
    • getenforce (To view the SE Linux mode), 
    • ls -Z (see the file/folder se context), unconfined_u:object_r:user_home_t:s0(user:role:type:level), 
    • id -Z (TO see the current user logged with se context view), 
    • sudo semanage login -l (To view the user' se context)
    • sudo semanage user -l (To view the se roles assigned to each user ids),
  • Change kernel runtime parameters, persistent and non-persistent
    • sudo sysctl -a (List kernel runtime parameters), 
    • sudo sysctl -w 'paramter=1/0' (non-persistence change),
    • sudo vi /etc/sysctl.d/swap-less.conf (Persistence change at this conf folder location), 
    • sudo sysctl -p 'conf. file path' (This will apply the changes without reboot), 
    • sudo chcon -t httpd_sys_content_t /var/index.html (Set se linux contex)
  • Restore default file contexts
    • enforcing=0 (GRUB Paramter to boot Linux into Permissive mode), 
    • selinux=0 (Kernel will not do anything related to SE Linux and post-reboot it will perform autorelabel. Setting this parameter in GRUB Conf. will cause it to perform autorelebel=1 for all files), 
    • autorelebel=1 (relabel all files)
  • Diagnose and troubleshoot SE Linux Policy Violation:
    • Scenario1: Httpd process stoped post changing listining port,
      • ausearch -c 'httpd' --raw | audit2allow -M m-httpd (Create Policy set),
      • semodule -i my-httpd.pp (enforce this policy)
    • Scenario2: Chaning the root httpd file path
      • grep 'httpd' /var/log/messages | less (search se linux related error message), 
      • semanage fcontext -a -t httpd_sys_content_t "/Directoty(/.*)?" (Change the files SE context type to service httpd se account type)
      • restorecon -R /Directory/ (To restore the new contexts for directory)
#> echo "Thank you :)"

Thursday, July 27, 2023

Manage Users and Groups(Part-8)

  In Part-7 of the Learning Linux blog series, we learned how to configure and manage basic networking in Linux Systems.

In part 8, We will construct basic commands to manage users and groups in the Linux Operating System.

  • Create, delete, and modify local user accounts
    • Create UserId: 
      • sudo useradd john (create a new user john with primary group as same john and assign home directory path, /bin/bash shell environment), 
      • sudo passwd john(set new password), 
      • sudo userdel john(delete user john without removing home/malspool, --remove should be used if you want to remove home dir), 
      • sudo useradd --shell /bin/othershell --home-dir /home/otherdir john, 
      • sudo useradd -s /bin/othershell john(just changing the default shell), 
      • sudo useradd --system systemacc(Add service/system account)
    • Local user accounts: 
      • cat /etc/passwd(this file store the userid details), 
      • sudo id (list the users who are signed-in), 
      • whoami(To see your current login userid detail), 
    • Modify users: 
      • sudo usermod --home /home/otherdir --move-home john (Modify the home dir),
      • sudo usermod --login jane john(Change username),
      • sudo usermod --shell /bin/othershell jane(change the default shell), 
      • sudo usermod -lock jane(lock/disable the account without deleting it), 
      • sudo usermod -unlock jane(unlock the account), 
      • sudo usermod --expiredate 2021-12-10(Set expire date for account), 
      • sudo chage --lastday 0 jane(set account's password to expire immediately or put -1 to un-expire it, --maxdays for set password expire days, -1 value means neverexpire),
      • sudo chage --list(To see the accounts expiration), 
    • Delete User/grp: 
      • sudo userdel -r jane, sudo groupdel john
  • Create, delete, and modify local groups and group memberships
    • Local group and membership: 
      • sudo gpasswd --add john developers(add john on developers group as secondary/supplementary), 
      • groups john(list the group membership for user john), 
      • sudo gpasswd --delete john developers(remove user from group), 
      • sudo usermod -gid developers john(Change the primary group for user john to developers),  
    • Modify group: 
      • sudo groupmod --new-name programmers developers(rename group),  
      • sudo groupdel programmers(Delete Group), 
  • Manage access to the root account
      • sudo --login or sudo -i(loging as root user if you're a sudo user), 
      • su --login or su -l(If you know the root password and does not member pf sudo), 
      • sudo passwd --unlock root(unlock the root account if it was locke, --lock to lock it again but ssh key login will still work),
  • Configure PAM(Pluggable Authentication Module)
    • man pam(list the pam modules and their help documentation), man pam.conf(To see the pam configuration help doc),
      • ls /etc/pam.d/ (list the pam related conf files), 

Note: Use the Linux manual using "man <command)" or "command --help" to access the command documentation for more detail. 

#> echo "Thank you :)"

Saturday, June 24, 2023

Manage Basic Networking(Part-7)

 In Part-6 of the Learning Linux blog series, we learned how to configure and maintain Linux Systems.

In part 7, We will understand and manage the basic networking features.

- Configure networking and hostname resolution statically or dynamically

ip link show (Show the list of IP Interfaces), 

IP address show (Show the IP addresses)

        ip route show (Shows the routing table), 

cat /etc/resolve.conf (show the DNS server IP Address)

NetworkManager: NetworkManager is a daemon that sits on top of libudev and other Linux kernel interfaces and provides a high-level interface for the configuration of the network interfaces.

        Configure Network Interface:

        sudo nmtui (Step1 - Launch GUI version of NM, Modify the IP as you like), 

sudo nmcli device reapply ensps03(Step2 - enforce the changes forcefully),  

          sudo vi /etc/sysconfig/network-scripts/adaptername (Use this for CentOS 7 and earlier)

Host resolution: Host file

Sudo vi /etc/hosts (Use this file for manually putting host entry for hostname resolution locally)


- Configure network services to start automatically at boot

sudo systemctl status NetworkManager.service(Confirm if the NM Service is already installed)

Starting Network service at the boot time: 

sudo nmcli connection modify ens0ps3 autoconnect yes (Set to start network adapter at boot time), 


- Start, stop, and check the status of network services

ss and netstat: ss or netstat is used to dump socket statistics. ss is faster and provides more detailed information, making it the preferred choice for network analysis and troubleshooting in Linux. However, netstat is more widely available and provides a more comprehensive output. In conclusion, both ss and netstat are valuable tools for network analysis and troubleshooting.


sudo ss -ltunp 


- Implement packet filtering

firewall-cmd --get-default-zone (show the default zones details)

firewall-cmd --list-all (list all ports or service details), 

sudo firewall-cmd --info-service=cockpit (show the port for allowed service),  

sudo firewall-cmd --remove-service=http (remove service), 

sudo firewall-cmd --remove-port=80/tcp (remove port), 

sudo firewall-cmd --add-source/--remove-source=10.11.12.0/24 --zone=trusted (Add or remove source network in trusted zone), 

sudo firewall-cmd --get-active-zones (list all active zones)

Make the firewall changes permanent:

1st: sudo firewall-cmd --add-port=80/http (Allow port 80 on dynamic for current session), 

sudo firewall-cmd --runetime-to-permanent (save the conf changes permanently),

2nd:  sudo firewall-cmd --add-port=80/http --permanent (does not make active for the current session but makes permanent)


- Statically route IP traffic

sudo ip route add 192.168.0.0/24 vi 10.0.0.100 (adding route to move traffic for target network via gw),  

        sudo ip route add 192.168.0.0/24 vi 10.0.0.100 dev enp0s3 (adding route to move traffic for target network via gw using device enp0s3),  

sudo ip route del 192.168.0.0/24(delete route), 

sudo ip route add default via 10.0.0.100 (set gw for all traffic), 

Add route permanently using Network Manager:

nmcli connection show(show the nm device interface), 

        sudo nmcli connection modify enp0s3 +ipv4.routes "192.168.0.0/24 10.0.0.100" ( Add the route - step1)

sudo nmcli device reapply enp0s3 (apply the settings - step2)

sudo ip route show (Confirm the change in the routing table)

Remove ip route: 

        sudo nmcli connection modify enp0s3 -ipv4.routes "192.168.0.0/24 10.0.0.100",  (step1)

sudo nmcli device reapply enp0s3 (then re-apply the settings)

GUI Method: sudo nmtui, 

sudo nmcli device reapply enp0s3(then re-apply the settings)


- Configure time service clients

chrony daemon (Daemon for sync clock), timedatact, 

Setup the time & zone: 

sudo timedatectl list-timezones (show all zones),  

sudo timedatactl set-timezone America/New_York ( Set time zone to America/New_York)

• Configure chronyd service: 

sudo yum install chrony, (Step1 - Intall chrony daemon if not present)

sudo systemctl start chronyd.service, (Step2 - Start the Chrony Daemon) 

sudo timedatactl set-ntp true (Enable the NTP)


Note: Use the Linux manual using "man <command)" or "command --help" to access the command documentation for more detail. 


#> echo "Thank you :)"


Tuesday, May 2, 2023

Deploy, Configure, and Maintain Systems(Part-6)

 In Part 5 of the Learning Linux blog series, we learned how to create and configure Linux file systems like ext4, vfat, xfs, etc. 

In part 6, We will learn and try to understand and construct the required commands to Configure, Manage and maintain the Linux systems. 


- Schedule tasks to run at a set date and time

    Cron Utility: For scheduling repetitive jobs that run every minute, hour, day, etc.

    Scheduling job with cron: Always advise not to put the cron job at the global cron table instead try user-level cron jobs(command - crontab -e)

    # Example of job definition:

# .---------------- minute (0 - 59)

# |  .------------- hour (0 - 23)

# |  |  .---------- day of month (1 - 31)

# |  |  |  .------- month (1 - 12) OR jan,feb,mar,apr

# |  |  |  |  .---- day of week (0 - 6) (Sunday=0 or 7) OR sun,mon,tue,wed,thu,fri,sat

# |  |  |  |  |

# *  *  *  *  * user-name  command to be executed

        crontab -l(list the cronjobs for logged-in user), 

        sudo crontab -e -u aaron(modify crontab for aaron user), 

        sudo crontab -r(remove crontab), 

        By placing the script file(without an extension like .sh) in the below directories:

        cron.daily/

cron.hourly/

cron.monthly/

cron.weekly/

    Scheduling job with anacron: Small unit anacron work with is day so it can run tasks for every days, weeks, months, etc. Cron can miss the job if system is offline but anacron can resume post power-on of the system.

        sudo vim /etc/anacrontab, 

anacron -T (test the anacron file), 

sudo anacron -n -f(force anacron to re-run the jobs again)

    Scheduling job with at: For onetime task.

at 15:00 --> return --> type command --> ctrl + d , 

atq(list the jobs), 

at -c <job id> (view the job detail including the command),

atrm <job id>(remove job), 

Example: 

at 'august 20 2022', 

at '2:30 august 20 2022', 

at 'now + 30 minutes', 

at 'now + 3 hours/days/weeks/months'


- Verify completion of scheduled jobs

    cat /var/log/cron(read the cron log), 

    sudo anacron -n(run the schedule job for today now), 

    sudo grep 'anacron' /var/log/cron(search for anacron in the cron log, you may also search for job name), 

    sudo grep atd /var/log/cron 

    Job command | systemd-cat --identifier=job1 (Record the logs about job in journalcrl), journalctl  | grep 'job1'( look for logs in journalctl for job1), 


- Manage the startup process and services

    Startup processes and services: systemctl cat sshd.service(looking at sshd service unit file), 

    sudo systemctl is-enabled sshd.service(Check the enablement status of service), 

    sudo systemctl enable/disable --now sshd.service(enable and start the service, disable and stop service), 

    sudo systemctl mask atd.service(This command will disable the service and other user/process/service cannot start the service), sudo systemcltl unmask atd.service(disable the masking), 

    sudo systemctl list-units --type service --all (List all service units), 


- Install and update software packages from Red Hat Network, a remote repository, or from the local file system

   Subscription Manager: rhel activating and attaching subscription.

    sudo subscription-manager register --username your-rh-developer-username 

   Repositories: Repository can be local or hosted in internet for all the packages

    sudo yum repolist (show the repository list), 

    sudo yum repolist -v (show the repo with urls, folder, etc), 

    sudo yum repolist all(list all repos optional or disabled ones), 

    sudo subscription-manager repos --enable/disable repo id or sudo yum-config-manager --enable/disable repo id, 

    Add Repos: sudo yum-config-manager --add-repo repo id

     Add repo by adding repo files: 

sudo vi /etc/yum.repos.d/docker-ce.repo 

<

[short name]

name=My repo full name name with desc

baseurl=http://server1.example.com/stable

enabled=1

>

    Managing Package with Yum: 

sudo yum seach 'short desc',  

sudo yum info package name(for more detail about the package), 

sudo yum install httpd, sudo yum reinstall httpd(Reinstall),

 sudo yum remove httpd(remove packages).

Package Groups: 

sudo yum group list(show the package groups), 

sudo yum group install 'Server with GUI', 

sudo yum group remove 'Server with GUI'

Install RPM file: sudo yum install ./package.rpm(install app using yum with rpm package), 

Updating and upgrading with yum: sudo yum check-upgrade, sudo yum update

Work with package module streams:

sudo yum module list, (list all modules)

sudo yum module list nodejs (list nodejs module)

sudo yum module install nodejs:14/development, (Installing nodejs version 14 with development profile)

sudo yum module list --installed nodejs, 


--> echo "Thank you :)"

Wednesday, March 22, 2023

Learning Linux - Create and Configure File Systems(Part-5)

 In Part 4 of the Learning Linux blog series, we learned how to configure local storage on Linux systems. 

In part 5, We will learn and try to construct daily usage commands to create and configure Linux file systems.

- Create and configure file systems

    mkfs.xfs -L "BackupVolume" /dev/sdb (format disk with xfs file syetem with label)

    mkfs.xfs -i size 500 -L "BackupVolume" /dev/sdb (format disk with xfs file syetem with label and 500 Bypes inode size)

    mkfs.ext4 -L "BackupVolume" -N 500000 /dev/sdb2 (Format disk with ext4 fs with Label and 500K inode numbers)

    xfs_admin (Manage and Monitor xfs filesystem), tune2fs(Manage ext4 filesystem)


- Create, mount, unmount, and use vfat file systems

    vfat (virtual file allocation table)

        sudo fdisk /dev/vdb     t for type; b for w95 FAT32

        sudo mkfs.vfat /dev/vdb1 (Up to 2GB in size)

        sudo mkfs.vfat -F 32 /dev/vdb1  (2 GB and larger)


- Configure systems to mount file systems at or during boot

    sudo mkdir /mybackupvol (create the folder where you want to mount your new volume)

    sudo vi /etc/fstab -----> /dev/vdb1   /mybackupvol       xfs    defaults 0 0 (1st- Device path, 2- mount point, 3- filesystem, 4-(defaults mount option, It can be customize), 5- 0 =fs dump disabled, 6- 1 = root fs, 2 = other fs apart from root), 

    man fstab(for more help)

    sudo systemctl reboot

    sudo blkid  /dev/sda1 (To check the disk sda1's UUID value)


- Configure disk compression(RHEL8 and earlier python based)

    Enabling vdo(virtual data optimizer)

        sudo yum install vdo -y, sudo systemctl start vdo.service

    Using vdo with storage devices

        sudo vdo --create --name=vdo_storage --device=/dev/vdb --vdoLogicalSize=10G (Create vdo storage from physical disk)

        sudo vdostats --human-readable (Check the vdo devices status)

        sudo mkfs.xfs -K /dev/mapper/vdo_storage (Format the vdo device using xfs file system)

    Mounting vdo devices

        Fstab file example: /dev/mapper/vdo_storage /mnt/myvdo xfs _netdev,x-systemd,device-timout=0,x-systemd.requires=vdo.service 0 0 

    RHEL9: lvmvdo: vdo tool has been merged into lvm

        1. Create physical volume: sudo pvcreate /dev/vdb 

2. Create volume group: sudo vgcreate vdo_volume /dev/vdb 

3. Creating lv using vdo enabled: sudo lvcreate --type vdo -n vdo_storage -L 100%FREE -V 10G vdo_volume/vdo_pool1 

4. Create xfs filesystem: sudo mkfs.xfs -L /dev/vdo_volume/vdo_storage

    Create ext4 filesystem: sudo mkfs.ext4 -E nodiscard /dev/vdo_volume/vdo_storage

- Manage layered storage

    Stratis: It's a local storage management tool for Linux 

        Enabling Stratis: sudo yum install stratisd stratis-cli

Creating Stratis Storage Pool: sudo stratis pool create my-pool /dev/vdc  /dev/vdd, sudo stratis pool list (list pools), sudo stratis blockdev(list block devices)

Creating a stratis filesystem: sudo stratis fs create my-pool myfs1, sudo stratis fs(list fs), 

Mounting Stratis filesystem: FSTAB Example: /dev/stratis/my-pool/myfs1 /mnt/mystratis xfs x-systemd-requires=stratisd.service 0 0 

Adding storage device to the Stratis  pool: sudo stratis pool add-date my-pool /dev/vde 

File system snapshot with stratis: sudo stratis fs snapshot my-pool myfs1 myfs1-snapshot 

Mount snapshot:  sudo stratis fs rename developers devfs devfs-bad,  sudo stratis fs rename developers devfs-snapshot devfs, sudo umount /mnt/devstorage, sudo mount /mnt/devstorage

    Taking backup of filesystem:

        sudo stratis fs snapshot my-pool myfs1 myfs1-snapshot (Creating snapshot of stratis fs)

sudo stratis fs rename my-pool myfs1 myfs1-old (Rename current fs)

sudo stratis fs rename my-pool myfs1-snapshot myfs1 (Next, Rename the snapshot fs to previous fs name)

        sudo umount and mount again


-> echo "Thank you :)"

Sunday, February 5, 2023

Learning Linux - Configure Local Storage(Part-4)

In Part 3 of the Learning Linux blog series, We have learned how to operate running Linux systems. 

In part 4, We will explore and try to construct daily usage commands to manage the local storage in the Linux systems.

- List, create, delete, and modify physical storage partitions

    Lsblk - Display the list of block devices, 

    cfdisk - display or manipulate disk partition table, 

    fdisk - manipulate disk partition table

- Configure and manage swap space 

    Create and manage swap space

  1. swapon --list ( Show the list of swap partition), 
  2. mkswap /dev/sdb3 - format the disk as swap partition, 
  3. swapoff/swapon /dev/sdb3 - enable/disable devices and files for paging and swapping

    Use a file for swap

  1. sudo dd if=/dev/zero of=/swap bs=1M count=1024 (Create a zerod file for 1 GB), 
  2. sudo chmod 600 /swap ( Change the swap file permission to allow only to root user), 
  3. mkswap /swap, swapon /swap

- Manage and configure LVM storage

    lvmdiskscan(check the LVM disk/volumes), 

    Adding Physical Volumes:

  • pvcreate /dev/sdb /dev/sdc(create the Physical Volumes), pvs(show the list of PVs),  

    Adding Volume Group and Extending

  1. sudo vgcreate my_volume /dev/sdb /dev/sdc (create VG), 
  2. sudo vgextend my_volume /dev/sdd (Extending the Volume Group by adding another Physical volume), 
  3. sudo vgs (shows the volume group), 

    Reduce VG:

  • sudo vgreduce my_volume /dev/sdd (Remove PV from existing VG), sudo pvremove /dev/sdd (Remove PV)

    Create Logical Volume:

  • sudo lvcreate --size 2G --name partition1 my_volume( my_volume = VG), sudo lvs (show the list of LVs),

    Extending or Resizing the LV:

  1. sudo lvresize --extents 100%VG my_volume/partition1(Extend partion1 by 100%), 
  2. sudo lvresize --size 2G my_volume/partition1(resize the partion1 to 2GB), 
  3. sudo lvresize --resizefs --size 3G my_volume/partition1(!!! Resize the lv using resizefs parameter if  lv is holding the file system)

    Format the lv by using filesystem(xfs):

  • sudo mkfs.xfs /dev/my_volume/partition1(format lv by xfs)

  - Create and configure encrypted storage

    Encrypted Storage:

        PlainMode:

  1. sudo cryptsetup --verify-passphrase open --type plain /dev/sdd mysecuredisk
  2. sudo mkfs.xfs /dev/mapper/mysecuredisk (Format the encrypted disk with xfs filesystem)

        LuksEncryption:

  1. sudo cryptsetup luksFormat /dev/sdd (format disk with luks)
  2. sudo cryptsetup luksChangeKey /dev/sdd (Change Encryption key)
  3. sudo cryptsetup open /dev/sdd mysecuredisk(Open the encrypted disk)

- Create and manage RAID devices

    Create and manage RAID Devices

  1. sudo mdadm --create /dev/md0 --level=1 --raid-devices=3 /dev/sdb /dev/sdc /dev/sdd (Create RAID 1 using 3 disks)
  2. sudo mdadm --manage /dev/md0 --add /dev/vde (Add disk to existing raid 1 array)
  3. sudo mkfs.xfs /dev/md0 (Format raid disk-md0 to xfs)

  • sudo mdadm --stop /dev/md0 (You may stop raid disk - md0)
  • sudo mdadm --zero-superblock /dev/sdb /dev/sdc /dev/sdd(Zeroed (remove) the disks)

  • sudo mdadm --create /dev/md0 --level=1 --raid-devices=2 /dev/sdb /dev/sdc --spare-devices=1 /dev/sdd(Create RAID 1 with Spare disk)
  • cat /proc/mdstat (Check the RAID Status)
  • sudo mdadm --manage /dev/md0 --add /dev/sdd (Add additional disk to existing RAID Disk - md0)
  • sudo mdadm --manage /dev/md0 --remove /dev/sdd(remove disk from RAID Array)

- Create, manage, and diagnose advanced file system permissions

  • getfacl, setfacl 
    • Example: sudo setfacl --modify user:aaron:rw examplefile (Assigning special permission to user aaron)
  • getfacl examplefile, 
  • sudo setfacl --remove user:john specialfile(Remove ACL Permission)
  • sudo setfacl --recursive --modify user:john:rwx collection/ (Set adv permission on directory)
  • sudo setfacl --modify mask:r examplefile (Assigning mask permission to read-only, Mask limit the permission),
  • Chattr (Making file attributes)
    • Example:
      • chattr +a newfile (Making file append for new content only)
      • chattr +i newfile (Making file Immutable)
      • lsattr newfile (Checking if file has immutable attr enabled)

- Setup user and group disk quotas for filesystems

    User and group filesystem Quotas

  1. dnf install quota ( install the quota app), 
  2. Enable Quota on xfs filesystem:
  3. sudo vim /etc/fstab, 
      • /dev/vdb1 /mybackups xfs defaults, usrquota, grpquota,  0 2 
  4. sudo systemctl reboot

    Enable quota for ext4 file system:

  1. sudo quotacheck --create-files --user --group /dev/vdb2
  2. sudo quotaon /mnt/

        Check user quota:
  • sudo edquota --user aaron (Checking quota for user edit mode, replace user with group if required)
  • sudo quota --user aaron (Checking quota for user)
  • sudo quota --edit-period (Change the grace period)


-> echo "Thank you :)"

Wednesday, January 18, 2023

Learning Linux - Operate Running Systems(Part-3)

In part 2 of this learning Linux basics, we tried constructing basic shell scripts using the condition, Loops, etc.

In the part 3 series of Learning Linux, We will try to perform the below Linux operations,

    1. boot, reboot, shutdown

    2. Change Linux OS operating modes

    3. Gain root access after interrupting the boot process

    4. troubleshoot bootloaders


- Boot, reboot, and shutdown a system safely:

    Reboot & shutdown: systemctl restart / systemctl poweroff

    schedule shutdown/reboot: shutdown 2:00 'shutting down for maintenance at 2 AM morning'

    shutdown -r 2:00 'rebooting  for maintenance at 2 AM morning'

- Boot or change the system into different operating modes

    Operating Modes(Targets)

- Graphical.target

- Multi-user.target

- Emergency.target

- Rescue.target

     Change Mode: systemctl set-default multi-user.target, 

     Switch Mode: systemctl isolate graphical. target

- Interrupt the boot process in order to gain access to a system

    Red Hat 8: 

    - Open GRUB Edit mode while booting


    - In the edit mode, Insert text rd.break at the end of the Linux GRUB syntax. CTL + X to proceed with the boot


    - You will be in Emergency target mode with swich_root login. The root file system will be default mounted as ro(read only). To check type: mount | grep /sysroot

    - You must remount the root file system with rw(read write) mode to change the root password. Run the below command to remount in rw mode: mount -o remount rw /sysroot.

    - Type cd /sysroot to change directory to root from Swich_root. 

    - Now you should be able to change root password. Type passwrd root 

    -  then at the end we must create a special file touch /.autorelabel . reboot


    Red Hat 9:

    - Start GRUB loader in edit mode and change crash kernel mode from ro to rw. At the end of Kernel syntax, we will add string: init=/bin/bash


    - Now, press CTRL + X to continue with boot process

    - In the next couple of seconds, you should be already in with root access. Type passwrd root to change the root password and type: touch /.autorelabel and exec /sbin/init to continue the boot process to load the OS.

- Install, configure and troubleshoot bootloaders
           When you in a situation where GRUB is unable to load the OS or getting errors. You might have to rebuild the GRUB config to fix the boot issue. Please follow the below steps

  1. Boot from bootable USB drive and start into 'Troubleshooting' mode
  2. you're in rescue mode and you should be prompted to try couple of options like 1. Continue: This will try to search for root filesystem and mount it for you, 2. Read-Only mode: Mount root fs in ro, 3. Skip to shell, 4. Quit(reboot).
  3. Select 1, Press 'Enter' and type: chroot /mnt/sysroot to get into root access mode
  4. Now, To Generate new GRUB config type: grub2-mkconfig -o /boot/grub2/grub.cfg (BIOS), grub2-mkconfig -o /boot/efi/EFI/centos/grub.cfg(EFI)
  5. Now, GRUB should be install on the first sector of OS disk. you need to find the physical disk holding the /boot and install the grub conf there.

lsblk (to find the block devices)

                grub2-install /dev/sda ( This will place the GRUB in first sector of disk /dev/sda) OR 

dnf reinstall grub2-efi grub2-efi-modules shim(EFI) 


    6. exit from troubleshoot mode to reboot the system

- Modify the GRUB configuration file 

    Open /etc/default/grub file in vim with sudo access. Modify the required parameters and save the file 

  •     grub2-mkconfig -o /boot/grub2/grub.cfg (BIOS), grub2-mkconfig -o /boot/efi/EFI/centos/grub.cfg(EFI)
  • reboot

- Diagnose and manage processes

Process Management: 

  • Examples: ps, ps aux (ax=all processes, u=user oriented format), 
  • ps u -U rahul ( All processes running by user rahul), 
  • ps lax (show nice values for processes), 
  • ps faux (show the parent of process), 
  • top,  pgrep -a syslog (process grep),  
  • nice -n <value -20/19> process id/name
  • renice <value> process id(sudo renice 7 8290), 
  • lsof -p 1(show the open files used by process id), Example: sudo lsof | grep sshd |  grep -i reg | sed 's/.* //g'(reg files used by ssd),
  • sudo lsof /var/log/messages(what process using the file)

        Process Signals: 

  • kill -l (list the valid signals) , 
  • pkill -KILL bash ( Kill the matching processes), 
  • ctrl + z (Pause the open program/process) and fg will bring it back(fg - foreground), 
  • sleep 180 & (Make the program run in background) and fg <id> will bring it back., 
  • bg 1 (make the first background program to run), 

- Locate and analyze system log files

        rsyslog = rocket-fast system for log processing(Default daemon for linux OS)

           Following log file: example tail -f /var/log/messages

        Journalctl

  • Example: journalctl /bin/sudo(Logs for a program), 
  • journalctl -u sshd.service(Log reported by a unit - service), 
  • journalctl -f(follow mode), 
  • journal -p err ( filter the logs by priorities like info, warning, err, crit), 
  • sudo journalctl -p info -g '^c' (g = grep, search for logs starting letter c),
  • last (who logged in), lastlog  

-> echo "Thank you :)"